
 Share on media

In the digital era where the world is adopting eCommerce, crafting an online store has been made easy with WooCommerce. Physical products, digital downloads, or services – irrespective of what you offer, WooCommerce is a powerful and flexible solution for your WordPress websites.
In this piece, let us have a comprehensive discussion on the detailed guide related to how to configure WooCommerce step-by-step, as well as its salient features and core advantages.
What is WooCommerce?
WooCommerce is an open and free WordPress plugin, which is quite popular in the eCommerce industry. It helps you convert your website into a fully functioning digital store. WooCommerce is one of the most prominent eCommerce platforms, catering to millions of users all around the world.
Reasons for Choosing WooCommerce
- Open-source and free-of-cost.
- Smooth WordPress integration.
- Supports scalability everywhere, ranging from small stores to large corporations.
- Customizable with numerous plugins and themes.
- No monthly charges (unless you have chosen to integrate paid add-ons).
WooCommerce, with its flexible features including WooCommerece Shortcodes, offers you complete control over your digital business irrespective of whether you are an established enterprise or a startup organization looking to expand. It is also ideal for WordPress web design.
Detailed Steps to Configure WooCommerce
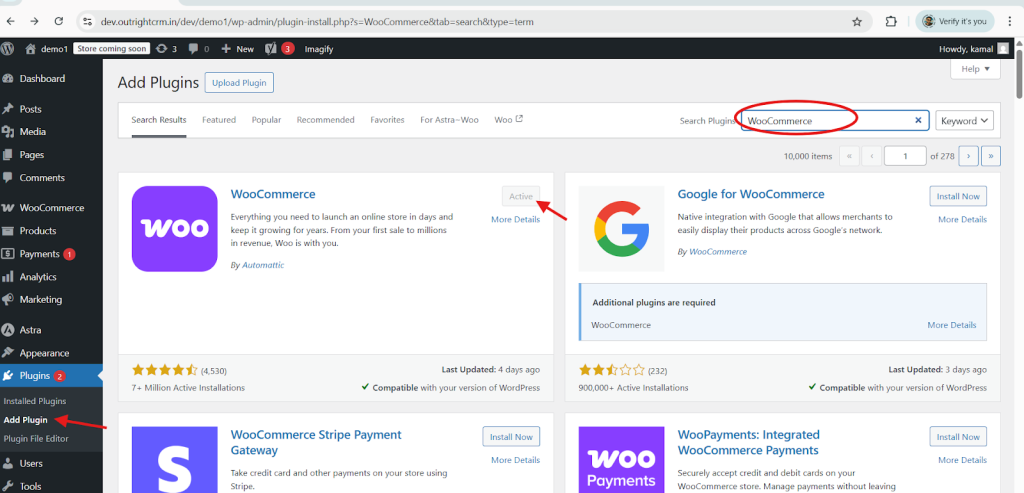
Step 1: Installation of Plugin
- Sign in to the admin panel of your WordPress.
- Next, go to the Plugins section, and choose the option Add New.
- Next, search for the WooCommerce plugin via the search bar.
- Next step is to press on the button ‘Install Now’ followed by the button titled ‘Activate’
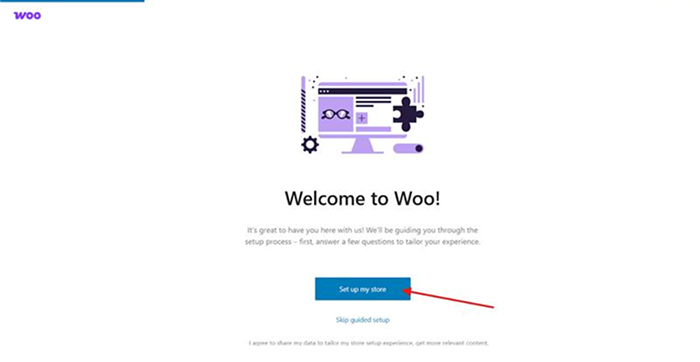
Step 2: Set Up
After you have completed the activation, the WooCommerce Wizard will help you throughout the WordPress Setup process where you have the option to choose:
- The country and address of the store.
- Industry types.
- Product as well as type of products (digital, physical, and subscription).
- Business size.
- Theme.
Step 3: Adding a Product in the Product Catalogue
To include a new product, proceed to arrive at the ‘Products’ section and then choose the option ‘Add New’. Next, you must provide the below-mentioned information:
- Title as well as description of your product.
- Pricing (sales as well as regular prices).
- Product images.
- Stock and Inventory Status (stock, SKU).
- Tags and Categories.
- Shipping information.
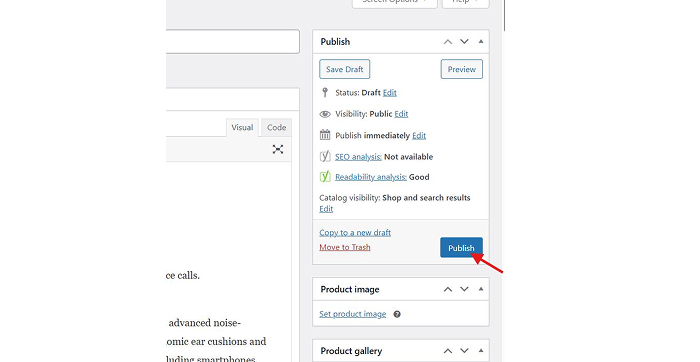
- Ensure that you provided all the information, and then finally, you can click on the “Publish” button.
Figure: Product creation within WooCommerce
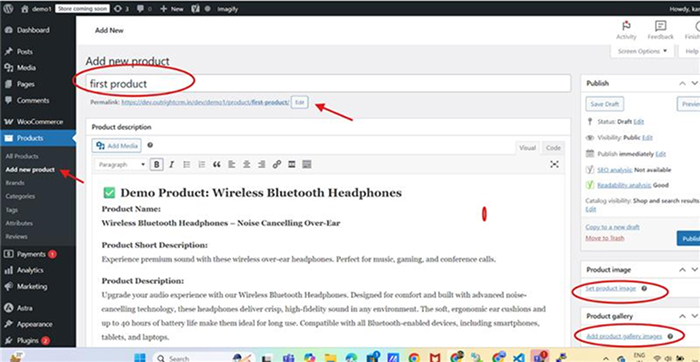
Figure: Product pricing
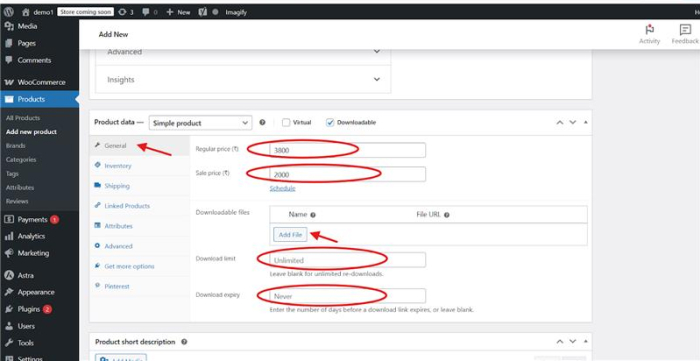
Figure: Product Inventory and Shipping Options Panel
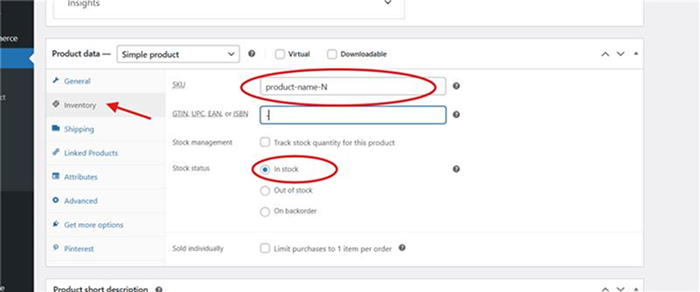
Figure: The figure shows the Publish button to publish your WooCommerce product
Step 4: Configuration of Payment
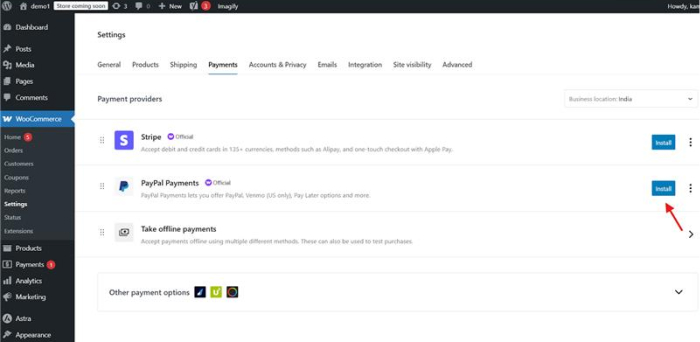
To add payment platforms and gateways, proceed to visit the WooCommerce ‘Settings’ and then tap on ‘Payments’.
Some of the available methods to add are:
- PayPal
- Stripe (credit or debit cards)
- Direct bank transfer
- Cash on delivery
- Razorpay, Paytm (via extensions)
Fig: WooCommerce Payments Tab
Step 5: Set up Shipping Zones
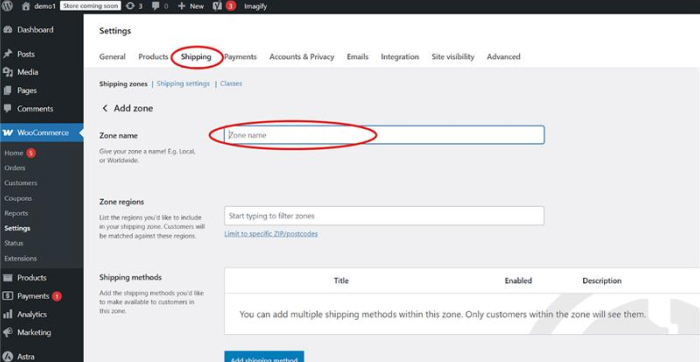
Shipping zones structuring requires you to go to the WooCommerce Settings and choose ‘Shipping’. There you can carry out the below-mentioned tasks:
- Mention the shipping zones as well as its regions (for e.g., USA, Canada, Australia)
- Include corresponding methods such as free shipping, flat rate, and local pickup.
- Ensure shipping classes for bulk rates
Figure: Shipping zone setting and regional configurations
Step 6: Creating Pages and Setting Navigational Flow
WooCommerce creates the below-mentioned default pages within the WordPress Directory Structure:
- Shop – for displaying catalogs of products.
- Checkout
- Cart
- My Account.
Proceed to the Appearance tab and choose the option ‘Menus’ to include these pages in your main navigation.
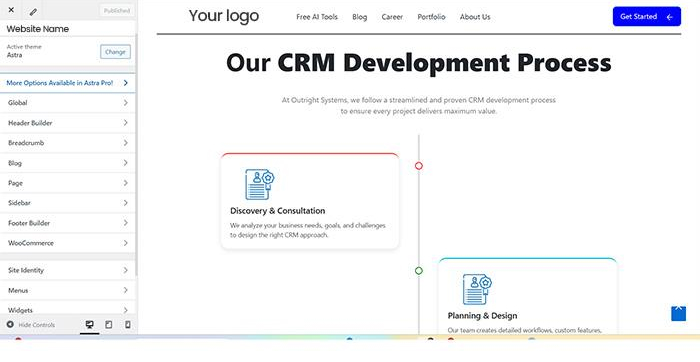
Step 7: Customization and Designing
Select the Appearance tab and choose the ‘Customize’ option to access:
- Homepage layout editing
- Colors and fonts adjustment
- Logo and brand positioning
- Product display modifications
Figure: Select customize option in the dropdown Appearance menu.
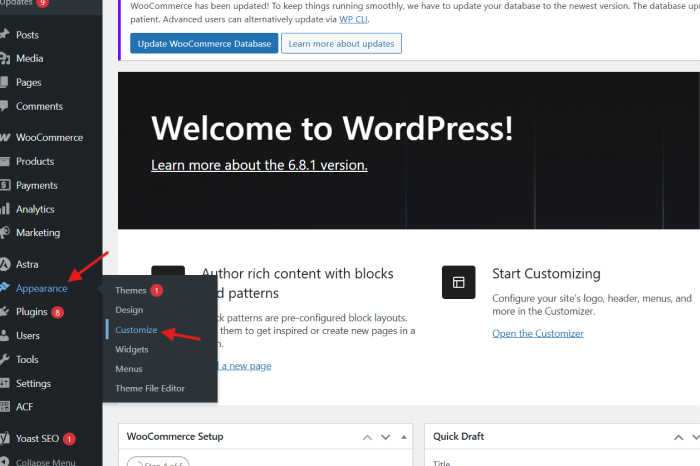
Figure: The above-mentioned figure displays the customization panel showcasing WooCommerce store and theme layout.
Key Features and Benefits
1. Product Operations and Management
- Feature: Listing of segmented, single, variable, or external products.
- Benefit: Products in distinct colors, sizes, or styles can be sold via one listing.
2. Supervision of Inventory
- Feature: Allows monitoring of status, stock quantity, and backorders as well as setting up alerts for low-stock situations.
- Advantage: Simplified operational workflow to prevent acceptance of extra orders.
3. Multiple Gateways for Payment
- Feature: Accept payments via numerous gateways such as Stripe, PayPal, COD, bank transfer, and more.
- Advantage: Flexible payment options that support distinct customer needs and preferences, enhancing sales.
4. Shipping Fluidity
- Feature: Distinct shipping zones with preferable methods and rates can be defined.
- Benefit: Customized delivery strategy for diverse order values and customer location.
5. Tax Management
- Feature: Automated tax calculation with tax class customized as per the customer’s location.
- Benefit: Compliance with the laws and regulations while lowering accounting stress.
6. Guest Checkout and Registration of Account
- Features: Registration of accounts, tracking orders, and management of guest checkout.
- Advantage: Ensures a smooth checkout process for returning and first-time customers.
7. Collection of Product Feedback
- Feature: Offers verified purchase badges to allow reviews with moderation and ratings.
- Advantage: Demonstrates social proof to enhance conversions and gain trust.
8. Coupons and Discounts
- Feature: Create coupons for fixed, percentage, or free shipping offers with limits of usage.
- Benefit: Inspires first-time buyers to make a purchase and improves promotional sales.
9. Analytics and Reporting
- Feature: Orders, product revenue, and performance tracking to gain insights of customers.
- Advantage: Improve strategizing and decision-making to enhance business growth.
10. Integration of Extensions and Plugins
- Feature: Plugins for shipping, marketing, bookings, CRM, and subscriptions can be incorporated quite easily.
- Advantage: Personalize your store as well as its operations to align with your vision and goals without any coding required.
11. Multi-lingual and Multi-currency Flexibility
- Feature: Execute Currency Switcher or WPML to support diverse languages and currencies.
- Benefit: Serve worldwide customers in their native language as well as currency to improve sales and customer experience.
12. GDPR & Security Compliance
- Feature: It provides SSL compatibility, GDPR-friendly platform, cookie notices, and customer information control.
- Benefit: Secure your store and develop customer confidence in your services and products.
Right Practices That Ensure Success
- Deploy SEO plugins (such as Yoast or Rank Math) for optimization of product.
- Centralize email marketing with Brevo or Mailchimp.
- Leverage caching plugins to streamline site speed.
- Conduct regular store backups with UpdraftPlus.
- Enable Live Chat (like Tawk.to or Crisp) for real-time customer assistance.
Final Thoughts
WooCommerce enables every aspect needed for the management of a successful online store with scalability potential. As a leading WordPress and CMS solution, it is the perfect toolkit for eCommerce success irrespective of the operational size and suitable for beginners as well as established enterprises.
You can design and create a fully functional online store that drives traffic, encourages conversions, and enhances customer experience with the right set, plugins, and approach.
%201.png)

%201.png)

%201.png)