
 Share on media
In the process of composing and publishing content on your WordPress website, the Writing Settings option has a significant influence in terms of how posts are written, styled, and published. Although themes and plugins capture most beginners’ attention, ignoring the Writing Settings may actually constrain the overall effectiveness of your publishing procedure.
The Writing Settings govern how you write and offer robust capabilities to customize the way you create and deal with posts, pages, categories, and even WordPress communications with external services. From emoticon formatting to sending via email, this area offers you more control and enables you to produce content that is easy to post and manage.
In this post, we’ll go in-depth on WordPress Writing Settings, describe each one in detail, and provide best practices for you to configure them based on your requirements. You’ll be able to use these settings to get your writing workflow super efficient by the end of it.
How to Access WordPress Writing Settings
Access the writing settings by simply:
- Log in to your WordPress Dashboard.
- From the left-hand menu, go to Settings → Writing.
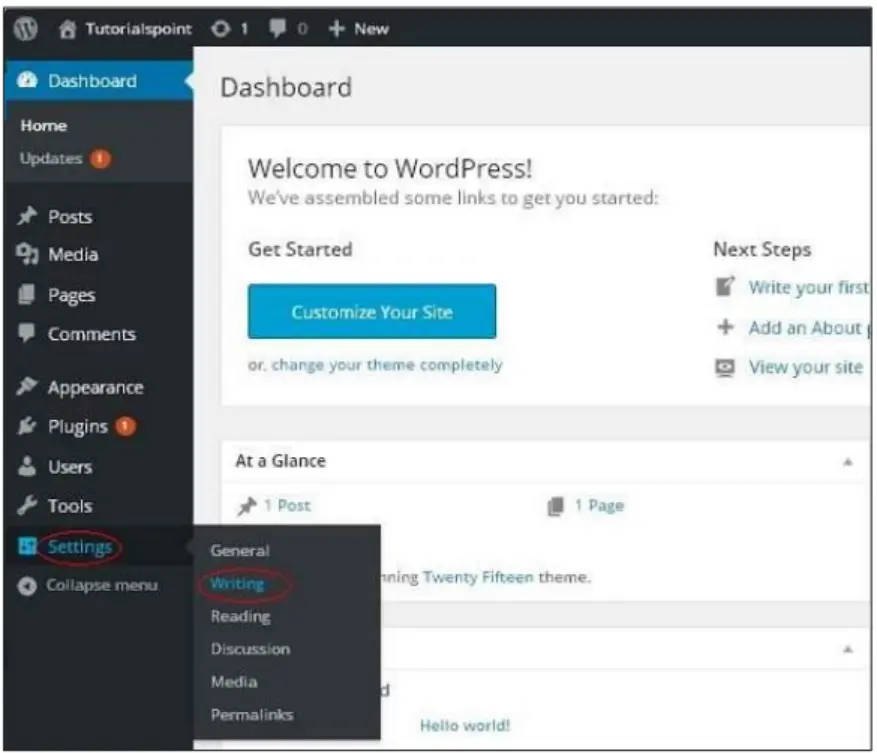
This will open up the Writing Settings page where you’ll see several fields and options. Let’s break them down one by one.
Key Options in WordPress Writing Settings
1. Formatting
The formatting section provides options to improve user experience while writing content. It comes with two checkboxes:
- Replace emoticons such as 🙂 and 😛 with graphics on screen
- If you turn this on, text-based emoticons will be converted to graphic-based emoticons automatically. For instance, 🙂 will be displayed as a smiling face emoji.
- If you turn this on, text-based emoticons will be converted to graphic-based emoticons automatically. For instance, 🙂 will be displayed as a smiling face emoji.
- WordPress must automatically fix wrongly nested XHTML
- This choice guarantees that if you by mistake create invalid HTML/XHTML code in a post, WordPress will automatically fix it. This is particularly helpful for new users who might not be comfortable with correct HTML structure.
- This choice guarantees that if you by mistake create invalid HTML/XHTML code in a post, WordPress will automatically fix it. This is particularly helpful for new users who might not be comfortable with correct HTML structure.
More information: WordPress Formatting Choices
2. Default Post Category
Whenever you create a new blog post, WordPress automatically assigns it to a default category if you don’t manually choose one. By default, this category is Uncategorized, but you can change it to something more meaningful, like “Blog,” “News,” or “Tutorials.”
Whenever you publish a new blog entry, WordPress will automatically set it to be in a default category if you don’t select one yourself. The default category is Uncategorized, but you can alter this to something more descriptive, such as “Blog,” “News,” or “Tutorials.”
Example: If you have a tech blog, you may want to set the default post format to “Tech Updates” so that none of your posts will end up being labeled with the generic “Uncategorized.”
Learn more: Managing WordPress Categories
3. Default Post Format
Post formats enable you to customize how posts are styled based on post type. The available post formats vary with your theme. Some popular ones include:
- Standard
- Gallery
- Link
- Quote
- Video
- Audio
By defining a Default Post Format, WordPress will then apply the same format to all of the new posts you make.
Example: Let’s say your site is primarily about videos. You can set the default format to “Video.”
4. Post via Email
One unique feature of WordPress is that you can publish your posts via email. This can be beneficial when you are on the go, away from your WordPress dashboard, or simply in need of rapid access to your written work.
Here’s how it works:
- You need to set up a secret email account with POP3 access.
- Any email sent to this address will be posted on your WordPress blog automatically.
This feature, however, needs additional setup and is not widely used these days because of security issues and mobile-friendly WordPress apps.
Example: A journalist blogging live can send articles directly by email, and WordPress will publish them automatically.
More information: Post by Email – WordPress Codex
5. Mail Server
In order to use Post via Email, you must enter information about your mail server.
- Example: mail.yourdomain.com
- This should be a POP3 compatible mail server.
WordPress will use this server to read incoming email and post it as an entry.
6. Login Name and Password
In order for WordPress to access the secret email account you’ve created, you’ll have to enter:
- Login Name – The email address used for posting.
- Password – The password for the above email account.
Important: This information should be kept private. If spammers gain access, they can flood your site with unwanted posts and links.
7. Default Mail Category
When sending posts through email, you can specify a Default Mail Category. This allows post sent via email to be automatically categorized properly rather than being put into “Uncategorized.”
Example: If you’re posting live reports from an event, you can make the default mail category “Live News.”
8. Update Services
One of the most powerful but least well-known options in Writing Settings is Update Services. Unlocking Next-level performance and visibility starts with properly configured update services that are crucial for maximizing your content’s reach.
Whenever you create a new post, WordPress can be configured to automatically notify update services (also referred to as ping services). These services subsequently inform search engines and aggregators about your new post, and this enhances indexing and SEO visibility.
WordPress has Ping-o-Matic (http://rpc.pingomatic.com/) enabled by default, which is a widely used pinging service. However, you can include additional services for increased outreach.
Some example services are:
- Ping-o-Matic
- Feed Burner
Why Are Writing Settings Important?
Most WordPress users undervalue Writing Settings, but setting them up right has a number of advantages:
- Better User Experience – Formatting options make posts tidy and professional.
- Consistency – Default formats and categories keep posts well-organized.
- Flexibility – Posting through email provides an added means of publishing content.
- SEO Boost – Update Services inform search engines about new entries sooner.
- Error Reduction – XHTML correction automatically saves time for new users.
Best Practices for Writing Settings Configuration
The following are some best practices recommended by experts to get the most out of Writing Settings:
- Change the Default Category
Do not leave posts as “Uncategorized.” Always use a meaningful default category. - Use Correct Formatting
Enable automatic XHTML correction to avoid layout problems. - Choose Post Format Wisely
Select the one that best suits your niche. For instance, bloggers can stick to “Standard,” while photographers can opt for “Gallery.” - Use Update Services with Caution
Don’t fill up with too many ping services, as it will be perceived as spammy. Stick to trusted services like Ping-o-Matic. - Be Careful with Post via Email
Only use it if absolutely necessary and secure your email account to prevent spam.
Related Resources
- WordPress Writing Settings – Official Documentation
- How to Use Post by Email in WordPress
- Update Services in WordPress
- Managing WordPress Categories
Conclusion
The WordPress Writing Settings do not seem as glamorous as themes or plugins but contain the secrets to a better, more streamlined content creation experience. Contents in WordPress effectively begins with mastering these foundational settings that create a publishing workflow that’s both efficient and professional.
From automatically categorizing posts to spacing out emoticons, correcting code issues, and alerting search engines of new posts, these settings save time and ensure consistency.
For most users, best practice is to:
- Change the default post category to something useful.
- Turn on XHTML correction for neater posts.
- Set up update services for improved SEO.
- Use post via email only if it’s unavoidable and secure.
By spending a few minutes getting the Writing Settings right, you can really make a difference to your WordPress publishing experience. It’s one of those “set it and forget it” aspects that keeps paying dividends as you develop your website. So the next time you install a WordPress site, do not bypass the Writing Settings. Set them up carefully, and you will see how much simpler and more productive it can be to create content!
%201.png)

%201.png)

%201.png)