

 Share on media


If you run a WooCommerce store, offering smooth and secure payment options is essential. Today, the most preferred payment gateway is Stripe which allows customers to use credit/debit cards, Google Pay, Apple Pay, and local methods—all directly on your website.
As online shopping grows, customers expect a checkout experience that feels effortless and trustworthy. A reliable payment gateway plays a huge role in that. Stripe not only speeds up the payment process but also creates a seamless flow from cart to confirmation, helping reduce abandoned checkouts and improving the overall buying journey.
This guide will walk you through installing, setting up, configuring, and testing the Stripe Payment Gateway in WooCommerce with accompanying screenshots and pro tips for live transactions.
What Is Stripe?
Stripe is a payment processing software allowing online businesses to accept payments via credit card and digital wallets. It is fast, easy and reliable and even supports subscriptions, refunds, and recurring payments—perfect for WooCommerce stores. This means customers don’t need to be redirected to another page — they can complete the entire checkout right on your website.
What makes Stripe stand out is how simple it is to set up. Even someone without technical experience can install the Stripe payment gateway in WooCommerce and start accepting payments within minutes. It supports multiple currencies and works globally, so whether you are selling locally or internationally, Stripe adjusts effortlessly.
Security is a major priority for Stripe. It uses encrypted transactions, PCI compliance, and fraud-detection systems to ensure that every payment is protected. The dashboard is user-friendly as well, allowing store owners to track payments, issue refunds, view reports, and manage subscriptions easily. Overall, Stripe offers flexibility, speed, and trust — making it a favourite choice for WooCommerce users around the world.
Why Choose Stripe for WooCommerce?
When you’re setting up the Stripe payment gateway in WooCommerce, choosing the right gateway can make all the difference.
- Accept all major credit/debit cards.
- Support for Google Pay, Apple Pay, and local payment methods.
- Instant setup—no monthly fees.
- Secure with PCI compliance.
- Supports WooCommerce Subscriptions for recurring billing.
Prerequisites Before Setup
Prior to connecting with Stripe, make sure you have:
- A working live WordPress site with WooCommerce installed.
- A Stripe account (you can sign up at https://dashboard.stripe.com/register).
- SSL (HTTPS) on your site – Stripe requires it for security reasons.
- Updated versions of WordPress and WooCommerce.
Step 1: Install the Official Stripe Plugin
The “WooCommerce Stripe Payment Gateway” is the official plugin for Stripe and is made by WooCommerce.
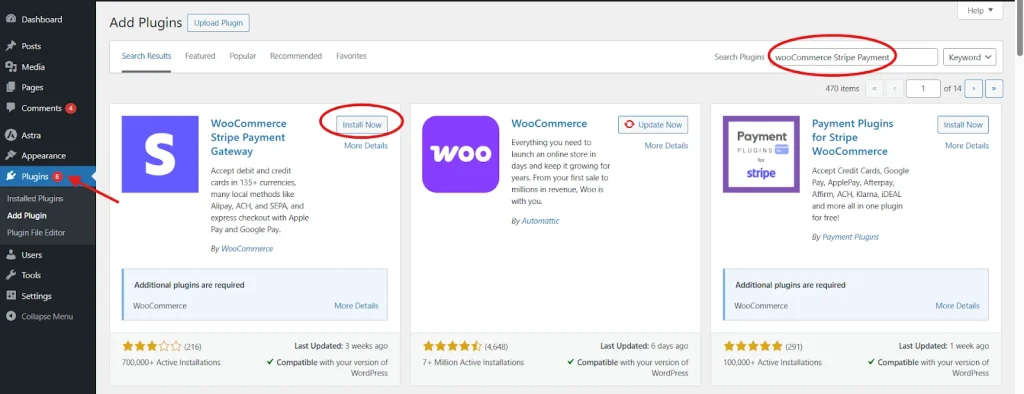
(WordPress Plugin → “WooCommerce Stripe Payment Gateway” by WooCommerce)
- Navigate to your WordPress Dashboard → Plugins → Add New.
- Search for “WooCommerce Stripe Payment Gateway.”
- Tap Install Now, then Activate.
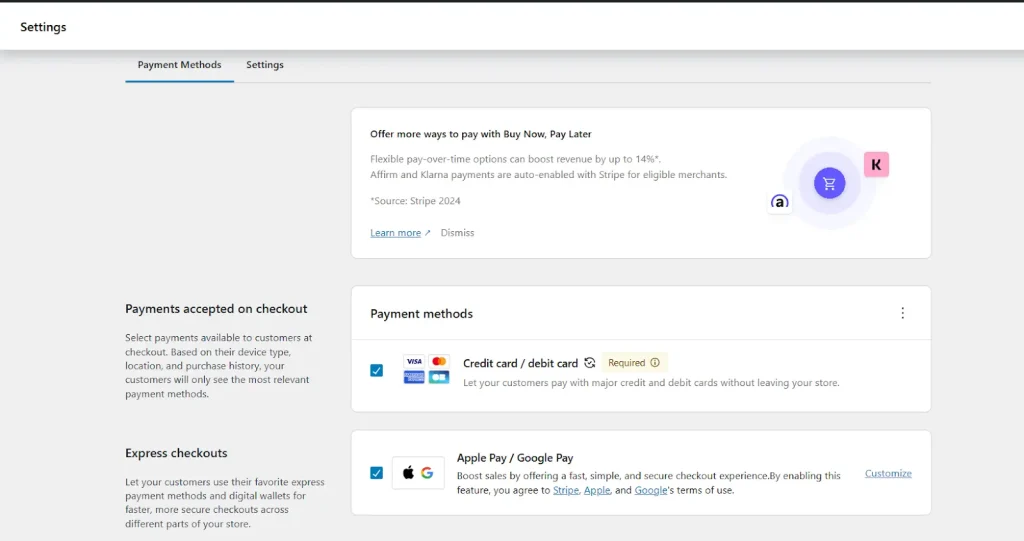
Step 2: Enable Stripe in WooCommerce Settings
Once the plugin is active:
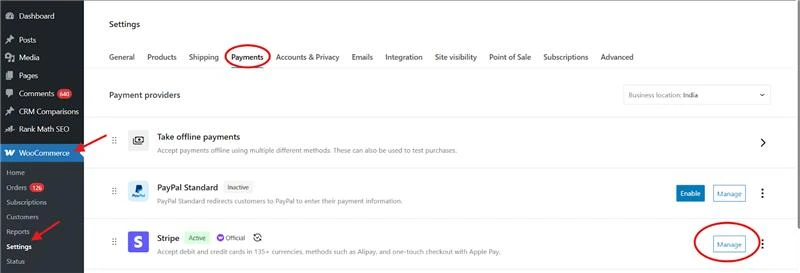
- Visit WooCommerce → Settings → Payments.
- You will see several payment options including “Stripe – Credit Card / Debit Card”
- Toggle the switch ON to enable Stripe.
- Finally, Select Manage or Set up next to Stripe.
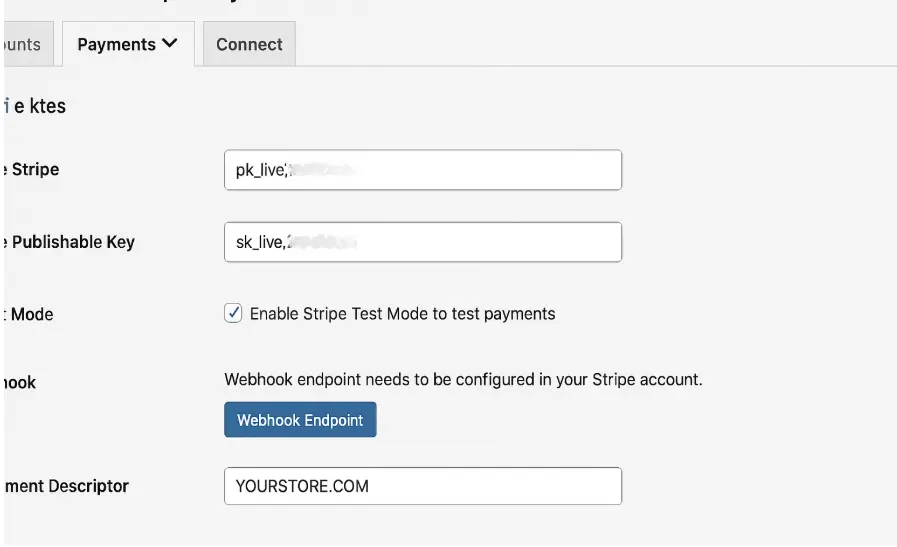
Step 3: Configure Payment Settings
WooCommerce → Payments → Stripe settings
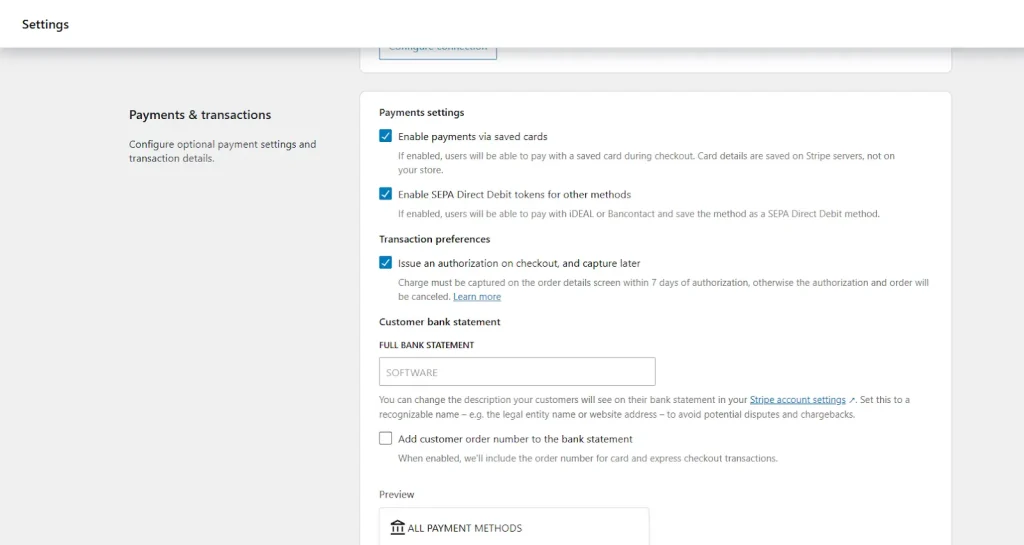
Important Settings to Configure:
| Setting | Description |
| Title & Description | What the customer sees when checking out (Ex: “Pay securely with Stripe.”) |
| Test Mode | Toggle this ON if you want to run a test payment prior to going live. |
| Capture Payments | Choose whether to capture payments automatically or manually. |
| Statement Descriptor | What the customer sees on their bank statement (Ex: YOURSTORE.COM). |
| Payment Request Buttons | Enable Apple Pay / Google Pay buttons on product and checkout pages. |
Step 4: Test Stripe Payments (Sandbox Mode)
Before you go live you should test your Stripe setup with Test Mode.

- Enable Test Mode in the Stripe settings.
- Go to the Stripe Dashboard → Developers → API keys.
- Copy the Test Publishable and Secret Keys.
Paste them into the WooCommerce Stripe settings.
Now use Stripe’s test card details to simulate transactions.
| Test Card Number | Card Type | Result |
| 4242 4242 4242 4242 | Visa | Successful payment |
| 4000 0000 0000 9995 | Visa | Payment Authentication required |
| 4000 0000 0000 0002 | Visa | The card is Declined |

Make sure your test order completes successfully.
Step 5: Switch to Live Mode
Once testing is complete:
- In the Stripe settings, turn off Test Mode.
- Go to your Stripe Dashboard → Developers → API Keys.
- Copy the Live Publishable and Secret Keys.
- Paste them into your WooCommerce Stripe settings and Save Changes.
Done! Your Stripe gateway is now live and can accept real payments.
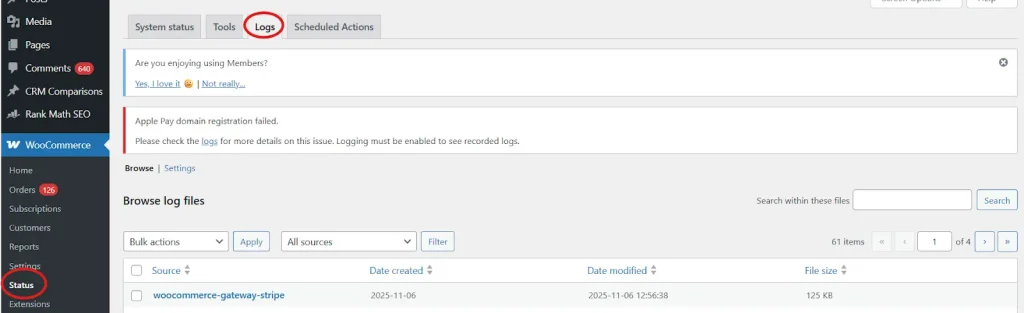
Step 6: Troubleshooting Tips
In case, Stripe is not functioning as expected, check the following:
- Make sure your site runs on HTTPS.
- Ensure WooCommerce and the Stripe plugin are updated.
- Check that your API keys are correct (Test vs Live).
- Check WooCommerce → Status → Logs for “Stripe” entries.
- Temporarily disabled conflicting plugins, such as caching plugins or checkout customizer plugins.
Step 7: Handling Refunds via WooCommerce
WooCommerce works seamlessly with Stripe for refunds.
- Go to WooCommerce → Orders.
- Select the order you would like to refund.
- Click Refund via Stripe.
The refund will process automatically. You can verify the refund under your Stripe Dashboard → Payments → Refunds.
Conclusion
Setting up the Stripe Payment Gateway in WooCommerce is easy, safe, and takes less than 10 minutes. With support for cards, wallets, and subscriptions, Stripe gives your customers a professional checkout experience and helps boost conversion rates. It handles recurring billing without hassle, making it perfect for both small and scaling businesses, provides security through fraud protection, encrypted card handling, and global compliance standards to make your customers feel at ease. Stripe grows with you too, whether you’re selling to buyers in your own country or across borders.
In short, Stripe doesn’t just process payments — it improves the entire buying experience. It helps build trust, reduces checkout friction, and ultimately increases sales. Once set up, it becomes a reliable payment backbone for your WooCommerce store, helping you run operations smoothly and professionally.